Difference between revisions of "Update openQRM on Debian"
| (One intermediate revision by the same user not shown) | |||
| Line 2: | Line 2: | ||
[[Category:Update]] | [[Category:Update]] | ||
[[Category:Debian]] | [[Category:Debian]] | ||
| + | This How-To explains how to update an existing openQRM environment to the latest openQRM version on Debian. | ||
| + | |||
| + | === Requirements === | ||
| + | |||
| + | * Two physical Server - at least 1 GB of Memory | ||
| + | * at least 100 GB of Diskspace | ||
| + | * VT (Virtualization Technology) enabled in the Systems BIOS so that the openQRM Server and the OpenStack system can run Virtual Machines later | ||
| + | * A minimal Debian installation on a physical server | ||
| + | * A pre-existing openQRM installation | ||
| + | |||
| + | === Get the openQRM === | ||
| + | This How-To to update an existing openQRM environment works for the openQRM Community Edition in the same way as for the openQRM Enterprise Edition. | ||
| + | |||
| + | The update procedure for openQRM is straight forward. | ||
| + | |||
| + | Get the latest version of [https://manage.openqrm-enterprise.com.au/product.php?do=product&pid=135&tab=1 openQRM Community Edition] or [https://manage.openqrm-enterprise.com.au/cart.php?a=add&pid=138 openQRM Enterprise Edition] | ||
| + | |||
| + | As 'root' change to the ../src directory and run: | ||
| + | |||
| + | <code>make && make update</code> | ||
| + | [[File:04.png|none|thumb|390x390px|Run <code>make && make update</code>]] | ||
| + | The 'make' phase is downloading the new components for the openQRM and preparing the source for an installation or update. The 'make update' phase actually is doing the following actions to update the existing openQRM setup: | ||
| + | |||
| + | As the first step the update procedure creates a current state-backup as described in our [[Backup your existing openQRM environment|Backup your existing openQRM]] How-To. | ||
| + | [[File:05.png|none|thumb|390x390px|Creating a current state-backup]] | ||
| + | At the second step, it creates a 'mirror' directory /usr/share/openqrm_pre_update. This is to compare the contents of all configuration files in a later step. | ||
| + | |||
| + | At the third step, it actually runs the install action which then overwrites the current /usr/share/openqrm content. | ||
| + | |||
| + | At the fourth step, the update procedure checks all configuration files and applies the current configured values to the new installation. | ||
| + | |||
| + | At the fifth step, it applies eventually database schema updates. | ||
| + | |||
| + | At last step, it updates the kernel initrd-files (used by network-deployment) and restarts openQRM | ||
| + | |||
| + | '''NOTE:''' | ||
| + | |||
| + | After the update it is required to restart the 'openqrm-client' on all integrated systems! | ||
| + | |||
| + | '''The following steps are only for openQRM Enterprise Edition (skip if you are using the openQRM Community Edition)''' | ||
| + | |||
| + | The openQRM Enterprise Edition forwards to the License-Upload. | ||
| + | [[File:08.png|none|thumb|390x390px|Licence-Upload]] | ||
| + | Please select the Enterprise Public, Server and eventual Clients License keys and click on submit. | ||
| + | |||
| + | '''NOTE:''' | ||
| + | |||
| + | As of openQRM 5.1, the following plugins got <u>merged</u>: | ||
| + | |||
| + | citrix + citrix-storage to citrix | ||
| + | |||
| + | kvm + kvm-storage to kvm | ||
| + | |||
| + | xen + xen-storage to xen | ||
| + | |||
| + | |||
| + | The following plugins got <u>renamed</u>: | ||
| + | |||
| + | lxc-storage to lxc | ||
| + | |||
| + | openvz-storage to lxc | ||
| + | |||
| + | For those plugins the VM configuration directory changed from /var/lib/[plugin-name]-storage to /var/lib/[plugin-name]. e.g. for the KVM-Storage plugin it is required to move the previous VM configuration directory /var/lib/kvm-storage to /var/lib/kvm. For KVM-Storage please run the following command as 'root' to do the directory migration. | ||
| + | |||
| + | <code>mv /var/lib/kvm-storage /var/lib/kvm</code> | ||
| + | |||
| + | The update procedure will not do this automatically since it is recommended to have this directory mounted from a NAS! | ||
| + | |||
| + | '''NOTES:''' | ||
| + | |||
| + | If you are using any of the above plugins the safest way to do the update to 5.1 is to stop and remove all appliances and VM resources (just keeping the VM Images), then do the update. | ||
| + | |||
| + | The 5.1 version provides an easy way to get the Images back into openQRM. Then simply create new VM resources and add new servers with the existing VM Images. | ||
| + | |||
| + | '''Congratulations!!''' | ||
| + | |||
| + | You have successfully updated openQRM! | ||
Latest revision as of 10:44, 11 November 2020
This How-To explains how to update an existing openQRM environment to the latest openQRM version on Debian.
Requirements
- Two physical Server - at least 1 GB of Memory
- at least 100 GB of Diskspace
- VT (Virtualization Technology) enabled in the Systems BIOS so that the openQRM Server and the OpenStack system can run Virtual Machines later
- A minimal Debian installation on a physical server
- A pre-existing openQRM installation
Get the openQRM
This How-To to update an existing openQRM environment works for the openQRM Community Edition in the same way as for the openQRM Enterprise Edition.
The update procedure for openQRM is straight forward.
Get the latest version of openQRM Community Edition or openQRM Enterprise Edition
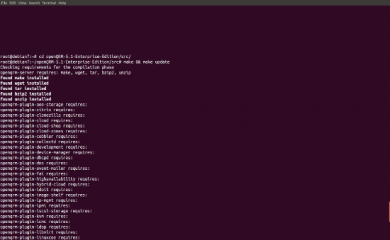
As 'root' change to the ../src directory and run:
make && make update
The 'make' phase is downloading the new components for the openQRM and preparing the source for an installation or update. The 'make update' phase actually is doing the following actions to update the existing openQRM setup:
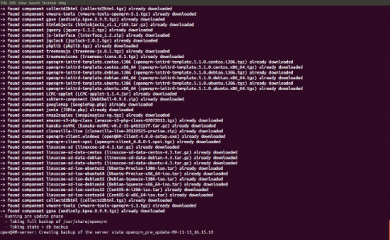
As the first step the update procedure creates a current state-backup as described in our Backup your existing openQRM How-To.
At the second step, it creates a 'mirror' directory /usr/share/openqrm_pre_update. This is to compare the contents of all configuration files in a later step.
At the third step, it actually runs the install action which then overwrites the current /usr/share/openqrm content.
At the fourth step, the update procedure checks all configuration files and applies the current configured values to the new installation.
At the fifth step, it applies eventually database schema updates.
At last step, it updates the kernel initrd-files (used by network-deployment) and restarts openQRM
NOTE:
After the update it is required to restart the 'openqrm-client' on all integrated systems!
The following steps are only for openQRM Enterprise Edition (skip if you are using the openQRM Community Edition)
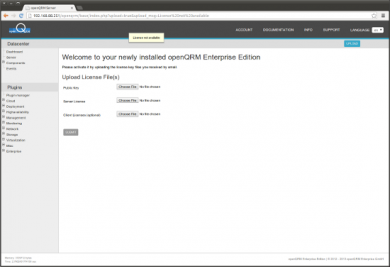
The openQRM Enterprise Edition forwards to the License-Upload.
Please select the Enterprise Public, Server and eventual Clients License keys and click on submit.
NOTE:
As of openQRM 5.1, the following plugins got merged:
citrix + citrix-storage to citrix
kvm + kvm-storage to kvm
xen + xen-storage to xen
The following plugins got renamed:
lxc-storage to lxc
openvz-storage to lxc
For those plugins the VM configuration directory changed from /var/lib/[plugin-name]-storage to /var/lib/[plugin-name]. e.g. for the KVM-Storage plugin it is required to move the previous VM configuration directory /var/lib/kvm-storage to /var/lib/kvm. For KVM-Storage please run the following command as 'root' to do the directory migration.
mv /var/lib/kvm-storage /var/lib/kvm
The update procedure will not do this automatically since it is recommended to have this directory mounted from a NAS!
NOTES:
If you are using any of the above plugins the safest way to do the update to 5.1 is to stop and remove all appliances and VM resources (just keeping the VM Images), then do the update.
The 5.1 version provides an easy way to get the Images back into openQRM. Then simply create new VM resources and add new servers with the existing VM Images.
Congratulations!!
You have successfully updated openQRM!


