Difference between revisions of "Install openQRM on Debian"
(Created page with "This HowTo is about how to install the openQRM Datacenter Management and Cloud Computing platform on Debian. It is the starting point for a set of openQRM HowTos explaining di...") |
(added short install version) |
||
| (11 intermediate revisions by the same user not shown) | |||
| Line 1: | Line 1: | ||
| − | This | + | This How-To explains installing the openQRM Datacentre Management and Cloud Computing platform on Debian. It is the starting point for a set of openQRM How-Tos explaining different Use-cases with the focus on virtualisation, automation and cloud computing. |
| − | Requirements | + | '''Requirements''' |
| − | One physical Server. Alternatively, the installation can be also done within a Virtual Machine | + | * One physical Server. Alternatively, the installation can be also done within a Virtual Machine |
| − | + | * At least 1 GB of Memory | |
| − | at least | + | * at least 40 GB of Diskspace |
| − | + | * Optional VT for Intel CPUs or AMD-V for AMD CPUs (Virtualization Technology) enabled in the Systems BIOS so that the openQRM Server can run Virtual Machines later | |
| − | |||
| − | |||
| − | + | === Install Debian === | |
| − | In the partitioning, | + | # Install a minimal Debian on a physical Server. During the installation select 'manual network' configuration and provide a static IP address. In this tutorial we will use 192.168.178.5/255.255.255.0 as the IP configuration for the openQRM Server system. |
| + | # Remember to use/set a Fully Qualified Domain Name (FQDN) as the sytem's hostname and domain. It does not need to resolve, but its important to be set. | ||
| + | # In the partitioning setup, select 'manual' and create one partition for the root-filesystem, one as swap space plus a dedicated partition to be used as storage space for the Virtual Machines later. In the configuration of the dedicated storage partition select 'do not use'. | ||
| + | # In the software selection dialog select just 'SSH-Server' | ||
| + | # After the installation finished please login to the system and update its packaging system as 'root': | ||
| − | + | <blockquote>''apt-get update && apt-get upgrade'' </blockquote> | |
| − | + | === Install openQRM - the short version === | |
| + | 1. download and un-compress openQRM Community or Enterprise to /usr/src | ||
| − | + | 2. un tar and install ; | |
| − | + | Community; | |
| − | + | ''tar -zxf openQRM-5.3.50-Community-Edition.tgz ; cd openQRM-5.3.50-Community-Edition/ ; ./install-openqrm.sh'' | |
| − | + | Enterprise; | |
| − | + | ''tar -zxf openQRM-5.3.50-Enterprise-Edition.tgz ; cd openQRM-5.3.50-Enterprise-Edition/ ; ./install-openqrm.sh'' | |
| − | + | This process can take a short while, whilst it installs the supporting openQRM packages. Minimum 10 minutes if you have fast internet and a decent kvm. | |
| − | + | 4. suggestion: add PVE kernel to KVM first, if used in conjunction with a Proxmox VE installation, | |
| − | / | + | wget <nowiki>http://download.proxmox.com/debian/dists/bullseye/pve-no-subscription/binary-amd64/pve-kernel-5.11.22-3-pve_5.11.22-7_amd64.deb</nowiki> |
| − | + | 5. create mysql openqrm user and password, flush privileges | |
| − | |||
| − | + | mysql -e "grant all on openqrm.* to 'openqrm'@'localhost' identified by 'openqrm'; flush privileges" | |
| − | + | 6. reboot, this is useful to the current KVM kernel (now the pve kernel) will be used as the default linux kernel. | |
| − | + | 7. then configure openqrm via web (remember the steps above the username and password are both openqrm), the last screen will take 5-10 minutes whilst openQRM rebuilds the current kernel's initrd into an openQRM compabille boot | |
| − | + | === Install openQRM - the longer version === | |
| + | Purchase and download openQRM | ||
| − | + | openQRM is available from openQRM Enterprise at | |
| − | |||
| − | + | <nowiki>http://www.openqrm-enterprise.com/</nowiki> | |
| − | |||
| − | ./ | ||
| − | + | You can also use the instructions below to install openQRM from the source repository or by packages. | |
| + | The installation procedure for openQRM is straight forward. | ||
| − | + | # Unpack the openqrm-enterprise.tar.gz file: | |
| + | <blockquote>''tar -xvzf openqrm-enterprise.tar.gz''</blockquote>2. Then run as 'root'<blockquote>''cd openqrm-enterprise'' | ||
| + | ''./install-openqrm.sh''</blockquote>Make sure to set a password for the mysql-server and nagios4 package. | ||
| + | [[File:Csm 02-openqrm-install e007a58550.png|none|thumb|390x390px|Setting a password]] | ||
The installation also asks for the mail-configuration. If unsure please select "local only" and go on with the suggested system name. | The installation also asks for the mail-configuration. If unsure please select "local only" and go on with the suggested system name. | ||
| − | + | [[File:Csm 04-openqrm-install b8db1a2840.png|none|thumb|390x390px|Mail-Configuration]] | |
| − | |||
The last step of the installation provides you with the URL, username and password to login to the openQRM Server | The last step of the installation provides you with the URL, username and password to login to the openQRM Server | ||
| + | [[File:Csm 06-openqrm-install fa5cc24876.png|none|thumb|390x390px|openQRM login credentials]] | ||
| − | + | === Installation by packages === | |
| − | |||
| − | |||
| − | |||
| − | |||
| − | |||
| − | |||
| − | |||
| − | |||
| − | |||
| − | |||
| − | |||
| − | |||
| − | |||
| − | Installation by packages | ||
To install openQRM by distribution packages please request the package installation from openQRM Enterprise | To install openQRM by distribution packages please request the package installation from openQRM Enterprise | ||
| − | Configure and initialize openQRM | + | === Configure and initialize openQRM === |
| − | After a successful installation the openQRM Server web interface is available at | + | After a successful installation the openQRM Server web interface is available at<blockquote>''<nowiki>http://static-ip-configured-during-the-Debian-installation/openqrm</nowiki>''</blockquote>If you have set the suggested IP address for this howto the openQRM URL will be<blockquote>''<nowiki>http://192.168.178.5/openqrm</nowiki>''</blockquote>Open this URL in your Web browser. Login with the username 'openqrm' and the password 'openqrm'. Then select the network interface to use for the openQRM management network |
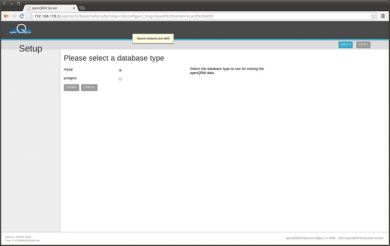
| − | + | [[File:Csm 07-openqrm-install 602e7d0524.png|none|thumb|390x390px|Network Interface selection screen]]Then select 'mysql' as the database type | |
| − | http://static-ip-configured-during-the-Debian-installation/openqrm | + | [[File:Csm 08-openqrm-install 5a821c5713.png|none|thumb|390x390px|Database type selection]] |
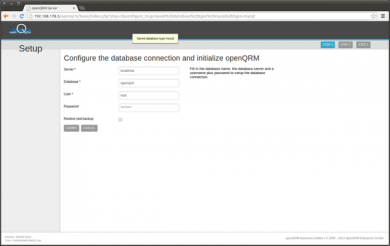
| − | + | At the next step, provide the database credentials | |
| − | If you have set the suggested IP address for this howto the openQRM URL will be | + | [[File:Csm 09-openqrm-install 10b3d582f9.png|none|thumb|390x390px|Database configuration]] |
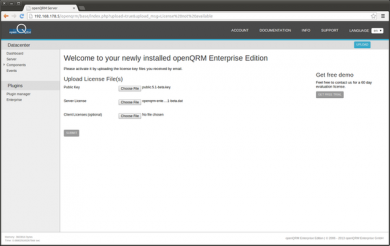
| − | + | For the openQRM Enterprise Edition, the following page provides an simple option to upload the licence keys | |
| − | http://192.168.178.5/openqrm | + | [[File:Csm 10-openqrm-install 3a06f002ca.png|none|thumb|390x390px|Upload licence keys]] |
| − | |||
| − | |||
| − | |||
| − | |||
| − | Then select 'mysql' as the database type | ||
| − | |||
| − | |||
| + | Once the license keys are provided openQRM will rebuild the current kernel into an openQRM initramdisk, this may take 5-10 minutes. | ||
| − | |||
| + | '''Congratulations!!''' | ||
| − | + | openQRM is now installed and successfully initialized ready to manage all aspects of your datacentre | |
| − | + | [[File:Csm 11-openqrm-install 8cdf50bf05.png|frameless|390x390px]] | |
| + | * | ||
| − | + | [[Category:Tutorial]] | |
| − | + | [[Category:Debian]] | |
| − | + | [[Category:Howto]] | |
| − | |||
| − | |||
| − | |||
Revision as of 17:01, 29 August 2021
This How-To explains installing the openQRM Datacentre Management and Cloud Computing platform on Debian. It is the starting point for a set of openQRM How-Tos explaining different Use-cases with the focus on virtualisation, automation and cloud computing.
Requirements
- One physical Server. Alternatively, the installation can be also done within a Virtual Machine
- At least 1 GB of Memory
- at least 40 GB of Diskspace
- Optional VT for Intel CPUs or AMD-V for AMD CPUs (Virtualization Technology) enabled in the Systems BIOS so that the openQRM Server can run Virtual Machines later
Install Debian
- Install a minimal Debian on a physical Server. During the installation select 'manual network' configuration and provide a static IP address. In this tutorial we will use 192.168.178.5/255.255.255.0 as the IP configuration for the openQRM Server system.
- Remember to use/set a Fully Qualified Domain Name (FQDN) as the sytem's hostname and domain. It does not need to resolve, but its important to be set.
- In the partitioning setup, select 'manual' and create one partition for the root-filesystem, one as swap space plus a dedicated partition to be used as storage space for the Virtual Machines later. In the configuration of the dedicated storage partition select 'do not use'.
- In the software selection dialog select just 'SSH-Server'
- After the installation finished please login to the system and update its packaging system as 'root':
apt-get update && apt-get upgrade
Install openQRM - the short version
1. download and un-compress openQRM Community or Enterprise to /usr/src
2. un tar and install ;
Community;
tar -zxf openQRM-5.3.50-Community-Edition.tgz ; cd openQRM-5.3.50-Community-Edition/ ; ./install-openqrm.sh
Enterprise;
tar -zxf openQRM-5.3.50-Enterprise-Edition.tgz ; cd openQRM-5.3.50-Enterprise-Edition/ ; ./install-openqrm.sh
This process can take a short while, whilst it installs the supporting openQRM packages. Minimum 10 minutes if you have fast internet and a decent kvm.
4. suggestion: add PVE kernel to KVM first, if used in conjunction with a Proxmox VE installation,
wget http://download.proxmox.com/debian/dists/bullseye/pve-no-subscription/binary-amd64/pve-kernel-5.11.22-3-pve_5.11.22-7_amd64.deb
5. create mysql openqrm user and password, flush privileges
mysql -e "grant all on openqrm.* to 'openqrm'@'localhost' identified by 'openqrm'; flush privileges"
6. reboot, this is useful to the current KVM kernel (now the pve kernel) will be used as the default linux kernel.
7. then configure openqrm via web (remember the steps above the username and password are both openqrm), the last screen will take 5-10 minutes whilst openQRM rebuilds the current kernel's initrd into an openQRM compabille boot
Install openQRM - the longer version
Purchase and download openQRM
openQRM is available from openQRM Enterprise at
http://www.openqrm-enterprise.com/
You can also use the instructions below to install openQRM from the source repository or by packages.
The installation procedure for openQRM is straight forward.
- Unpack the openqrm-enterprise.tar.gz file:
tar -xvzf openqrm-enterprise.tar.gz
2. Then run as 'root'
cd openqrm-enterprise ./install-openqrm.sh
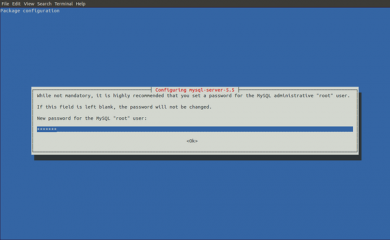
Make sure to set a password for the mysql-server and nagios4 package.
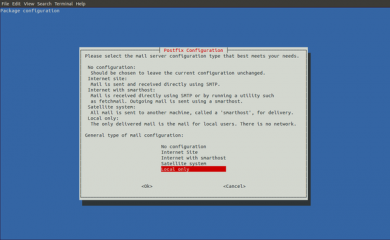
The installation also asks for the mail-configuration. If unsure please select "local only" and go on with the suggested system name.
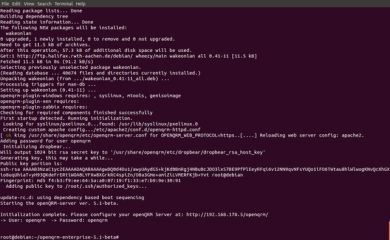
The last step of the installation provides you with the URL, username and password to login to the openQRM Server
Installation by packages
To install openQRM by distribution packages please request the package installation from openQRM Enterprise
Configure and initialize openQRM
After a successful installation the openQRM Server web interface is available at
http://static-ip-configured-during-the-Debian-installation/openqrm
If you have set the suggested IP address for this howto the openQRM URL will be
http://192.168.178.5/openqrm
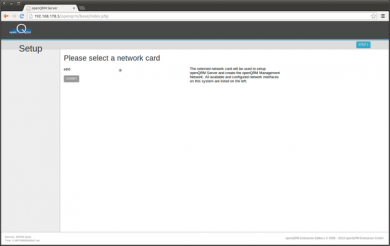
Open this URL in your Web browser. Login with the username 'openqrm' and the password 'openqrm'. Then select the network interface to use for the openQRM management network
Then select 'mysql' as the database type
At the next step, provide the database credentials
For the openQRM Enterprise Edition, the following page provides an simple option to upload the licence keys
Once the license keys are provided openQRM will rebuild the current kernel into an openQRM initramdisk, this may take 5-10 minutes.
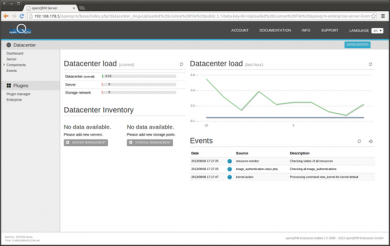
Congratulations!!
openQRM is now installed and successfully initialized ready to manage all aspects of your datacentre
